
Digital marketing is an invaluable resource for any nonprofit that wants to optimize its advocacy, fundraising, impact, and stewardship.
Here’s why.
In 2021, online donations grew by 42 percent compared to 2019.
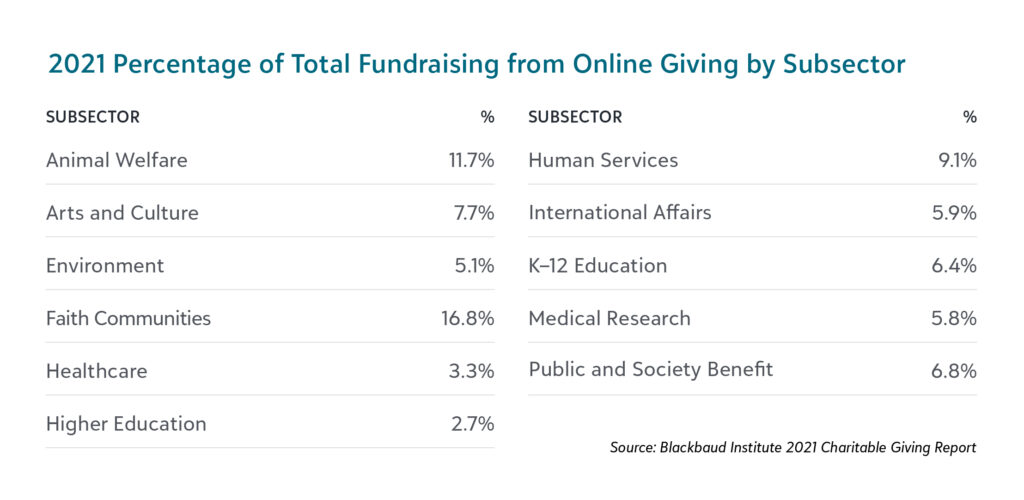
Online giving in 2021 contributed 17.8 percent of total fundraising for small nonprofits (less than $1 million), 11.3 percent for medium-sized nonprofits ($1–10 million), and 11.1 percent for large nonprofits ($10 million-plus).² The following chart breaks down total fundraising percentages by common charity sectors.²
Overall, online fundraising revenue for large nonprofits increased by 9.8 percent in 2021 compared to the previous year. Medium-sized and small nonprofits saw an 8.7 percent and 3.9 percent increase in online donations, respectively.²
Plus, the average one-time donation in 2021 increased from $111 to $125, with a 23 percent retention rate, and the average monthly donation increased from $24 to $25, with a 60 percent retention rate, compared to 2020.¹ If these figures sound enticing to you, then let’s get started on building your online marketing plan and strategy.
What You’ll Learn In This Guide
Most small and medium-sized nonprofits we’ve worked with know they should be doing digital marketing. Still, they’re reluctant to dip their toes into the dark, unknown waters because they don’t know where to start, how to optimize their current marketing efforts, or if the investment will pay off.
This guide unravels the mystery and teaches you the concepts, processes, and tools necessary to set up and optimize your organization’s digital marketing strategy.
I don’t want to bore or overwhelm you by diving into the minute details about how to complete each tiny step throughout the process. This post would be colossal and unreadable if I did. Instead, whenever we discuss a task you should perform, you’ll find hyperlinks to the resources you need to learn how to perform the recommended process.
I also want to cleanse the angst about the costs associated with digital marketing. All marketing tools recommended in this guide are free or offer discounts to 501c(3) organizations.
In the following chapters, you’ll learn about:
One more note before we dive into the nuts and bolts. If you’re setting up your company’s digital marketing services for the first time, I recommend starting with the Analytics section and then working your way through the guide in order.
The preamble is complete. Let’s get started!
Google Analytics for Nonprofits
An analytics program is the foundation your digital marketing strategy is built upon. With analytics data, you can accurately measure who is visiting your website, what they’re doing, and how effective your marketing efforts are.
I recommend you use Google Analytics (GA) because it is the easiest analytics platform to understand and is free. Plus, GA is the most commonly used analytics platform, so there is a chance somebody at your organization has prior experience with it.
Step One: Get Google Analytics
If you already have a Google Analytics account set up, go ahead and skip to Step Three: Establish Goals in Google Analytics. Otherwise, your first step is to sign up for Google Analytics.
After you’ve created a GA account, you should set up your website as a “property” in Google Analytics so you can begin collecting data about your website’s visitors. Afterward, you’ll need to create your first GA “reporting view.” Views let you analyze the data you’re collecting. And last, you must add the analytics tracking tag to your website.
Optional Step: Join Google for Nonprofits
Google for Nonprofits is Google’s way to level the playing field for nonprofit businesses. The program offers free Google platforms, like G-Suite, Google Ad Grants, and the YouTube Nonprofit Program. Google also provides in-depth tutorials that show nonprofits how to get the most out of each Google service.
Step Two: Learn Analytics Terminology
After you’ve signed up for Google Analytics and set up your account, the next step is to begin exploring the tool. While you do this, you’re presented with a lot of new terms and concepts. Loves Data put together a comprehensive Google Analytics Glossary to learn the terms you’ll see in GA.
Step Three: Establish Goals in Google Analytics
In analytics-speak, a “goal” is synonymous with a website conversion: any kind of meaningful action a user can take on your site. This engagement could be a video view, pledge signature, contact form fill, newsletter subscription, etc.
Most non-profit websites create goals focused on three things:
- Convincing people to give money to the cause — donations;
- Convincing people to give time to the cause — volunteering; or
- Connecting with people who need your organization’s help.
Each path needs to be mapped to a goal in GA to understand how effectively your website achieves these objectives.
The simplest way to do this is to configure a “destination goal” in Google Analytics to understand how many unique visitors make it to a thank you page after giving money, filling out a form, or supplying contact information. The destination goal, combined with content performance KPIs, can paint a vivid picture displaying how users interact with your website.
If you don’t have a thank you page, you can use Google Tag Manager (GTM) to set up event tracking that will serve as your goal data. Step four explains what GTM is and how you can use it to supplement GA.
Step Four: Set Up Google Tag Manager
Tag Manager puts the power of analytics deployment in the hands of marketers instead of developers or IT. Google Tag Manager is free and allows you to ensure GA is set up to measure all content on your site. It also helps you set up event tracking for all form fills and link clicks on the site.
Note: If you choose to deploy GA via Google Tag Manager, make sure to remove any previous instance of the GA tracking script you installed on your site back in Step One. This removal prevents you from seeing duplicate visits. If you choose not to deploy GA via GTM, then leave the tracking script in place.
In the nonprofit world, it’s vital that small marketing teams hold all the keys to the kingdom in terms of enabling tracking, which Tag Manager accomplishes. If they don’t, getting outside developer help can get expensive quickly.
Through GTM, you can:
- Track clicks off to third-party sites where the conversion occurs; or
- Observe form submissions on any page, even forms that don’t submit to a thank you page.
Learn how to perform both of those methods in this Google tutorial.
Thank you pages and GTM tracking cover the essential conversions. But you should also know how visitors engage with off-site content that leads up to donation and volunteer action. If you’ve embedded a YouTube video explaining what your non-profit does, GTM allows you to send events to GA around plays and completions of that video. This correlation helps you know what content resonates with users.
If you have printable resources that visitors can share to spread the word about your cause, you can track usage of those with the aforementioned link click tracking.
The last thing to consider is tagging your campaigns. Many nonprofits have email lists and social media followings that they’ve spent years gathering and rely on for annual giving seasons. Properly tagging links from those emails and social media posts to your website using UTM parameters will let you know how effectively they drive revenue.
For a broader list of things that can and should fall under the banner of goals from an analytics perspective, check out this article on analytics goal tracking on Portent’s blog.
Step Five: Keep Learning
Google Analytics is a robust platform that can revolutionize how well you understand your website users. If you’d like to learn more about how to best use Google Analytics, I strongly encourage you to register for Google’s free Analytics Academy. The program has a variety of self-serve courses for people of all analytics knowledge levels.
Step Six: Implement Additional Analytics Tools
One area where GA lacks is in providing a visual understanding of how customers are engaging with a page layout, which is useful when you evaluate how to optimize existing content. Hotjar is a great tool for visual mapping, as it allows for comprehensive heat mapping, hover mapping, and scroll mapping of your content. And again, it’s free with some reasonable limitations (you can only heatmap up to three pages at a time on the free plan).
Content Strategy for Nonprofits
Content strategy helps determine what message your website communicates and how. With content strategy, you can plan your website around the needs of your users. This approach lets your online platforms cultivate a positive and enriching experience that simultaneously helps people and achieves your company’s goals.
In the context of content strategy, “content” means anything on your website that communicates an idea to a user. Here are a few common content types:
- Landing pages (products, services, donation forms, contact us pages, etc.)
- Blog posts
- Resource guides
- Images
- Videos
- Podcasts
- Accountability reports
In the following steps, the term “content” references all types of content your nonprofit might produce.
Step One: Determine the Objective of Your Website
Your website should have clearly defined expectations and goals, such as increasing donations, building brand awareness, and getting people to volunteer. Every content strategy decision you make should further these goals.
If you don’t know what your organization is trying to achieve with the website, now is the time to define it. We suggest reading the goal-setting guide by Lucidchart if you want a template or ideas for how to establish your website’s goals and objectives.
Step Two: Evaluate (And Fix) Your Navigation
The navigation and sub-navigation should accurately reflect your website’s content and the user journey you’re trying to create. If you want examples of how to build a user journey map, HubSpot has an excellent guide.
The navigation should also relate to the goals you established in step one. For example, let’s say you run an animal adoption shelter and the website has four goals:
- Adopt homeless animals
- Acquire donations
- Attract volunteers
- Build community awareness about pet-related issues
Your navigation should present the opportunity for users to interact with all four objectives. It should have labels for open adoptions, a donation icon, a call out for volunteers, and an “about us” or “how we help” section. Below is an example from the Humane Society showing how their navigation approaches this scenario.

If your navigation does not reflect the goals established in step one, if it doesn’t accurately capture your existing content, or it doesn’t help people find the information they’re looking for, then I suggest you fix the navigation.
First, learn how to decide what goes in the navigation. Next, learn how to write descriptive navigation labels. Last, ensure your navigation is mobile-friendly and responsive.
Step Three: Be Intentional With Hero Images
Hero images set the mood and theme for a given page. On your homepage, the hero should emphasize what your brand does, a current promotion, or a long-term goal. The image should be brand or campaign relevant, easy to understand, and emotionally persuasive.
On a landing page, such as a volunteer sign-up, event announcement, or blog post, the hero image should emphasize the subject matter being discussed.
Below is an example of how a hero image emphasizes what the Environmental Defense Fund does while also promoting a campaign.

The simple, emotional image works incredibly well from multiple standpoints. The polar bear is walking between thinning ice sheets and just barely making it, symbolizing it needs help. The bear’s face points directly at the Give Now button. The button itself is bright blue and easily distinguishable. Plus, because the image is static, rather than a video or carousel, this scene is the user’s sole focus when first visiting the page.
Step Four: Use Descriptive Labels
Descriptive calls to action, anchor texts, or navigation labels are vital to the success of your website because they show users what to expect upon clicking a link or button. By setting clear expectations, the copy leaves no room for interpretation, and users can navigate your website with minimal frustration.
When you write an interactive label, perform a quick test. If you wrote the copy on a blank piece of paper and showed it to a stranger, would they understand what you are talking about? Is it descriptive enough that they would understand the context and have reasonable expectations about the content to follow?
Step Five: Set Up a Donation Platform
Online donation processing is among the more challenging aspects of running a nonprofit. A quality, customizable payment processing platform that integrates into your existing content management system (WordPress, HubSpot, Drupal, etc.) is a lifesaver for small-to-medium nonprofits.
An embedded platform increases conversions during the donation stage because users stay on the same domain and can donate through multiple trusted methods, such as PayPal, Apple Pay, or Google Pay. Some platforms also allow you to receive donations in foreign currency and harvest donor data, letting you personally thank donors or send annual donation reminders.
I recommend Donorbox for small-to-medium organizations. The platform is robust, reputable, and has quality customer support. Plus, Donorbox is free to use for the first $1,000 you collect each month. The platform charges a 1.5 percent fee on donations after $1,000.
Below is an example of how the Donorbox payment form can look, via one of Portent’s pro bono clients, Rise Up School of Dance.
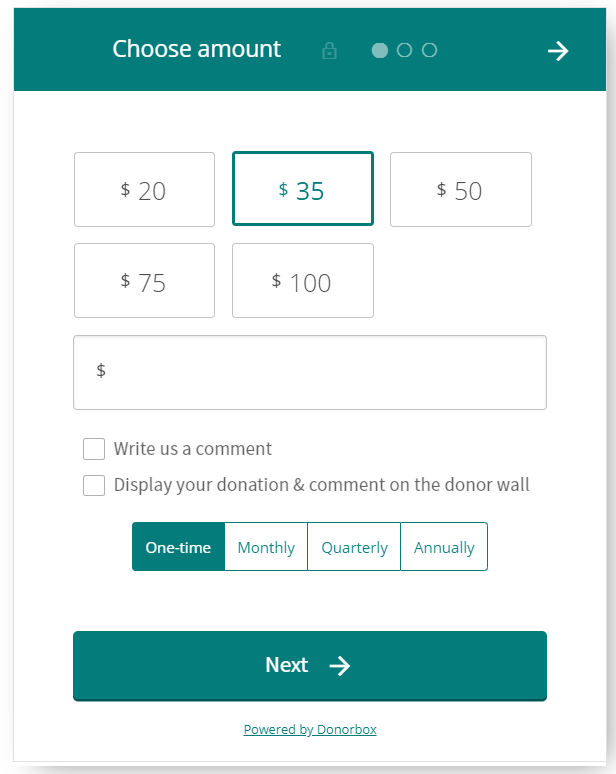
Step Six: Optimize Your Donation Page and Form
The donation page and experience should be simple and focused only on donations. Keep events, programs, and other non-donation-related content off the donation page.
Below is an example of a great donation form and experience.

This form and page accomplish eight crucial donation form best practices:
- The “Donate” hero image clearly identifies where users are and the purpose of this page.
- The form pre-selects a donation amount, which can improve form performance and increase the average donation.
- The form lets users choose if they want to donate once or set up a recurring donation.
- The form requires only necessary information.
- The copy tells users how their donation is being used and emphasizes the donation is tax-deductible.
- The page offers social proof with a Charity Navigator Badge.
- The sidebar includes additional donation formats, in case users want to donate in more ways than cash.
- After a user completes the form, they are directed to a Thank You page.
If possible, ensure your donation form meets the eight best practices in the above list. If you’d like to go further in optimizing your donation form or landing page, check out this guide.
Step Seven: Use Visually Distinct Donation Buttons
Donations are the bread-and-butter of every NGO, and users expect to be able to locate a donation button from any page within a few seconds. The industry standard is to have the donation button in the top-right navigation. You should also make the donate button a bright color to clash against the rest of the design.

Step Eight: Evaluate (And Fix) Your Footer
The purpose of the footer is to provide easy-to-find information, boost organic search results, and build internal links. The footer navigation shouldn’t be a catch-all spot to plug extra links you want to promote. Instead, it’s important to keep this section of your website clean, concise, and readable.
The footer should be home to hard-to-find content and commonly expected information, such as contact options, careers, brand partners, testimonials or awards, and social media profiles.
Below are two examples of nonprofits that have clean, optimized footer navigations:
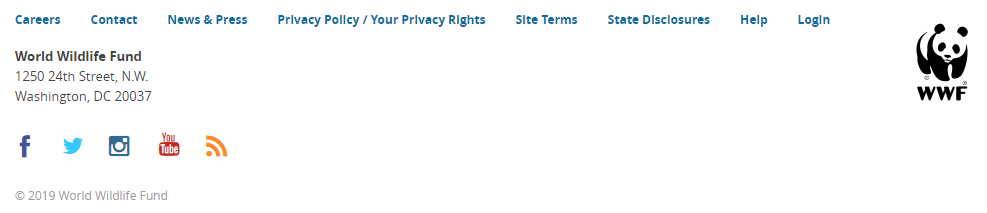

For more in-depth information, the Nielsen Norman Group has an in-depth guide on how to optimize your footer.
Step Nine: Create User-Centric Content
Creating content your users care about is a never-ending step. To remain relevant in search results and maintain your user’s interest, you need to publish high-quality content on a regular basis.
High-quality content always focuses on a user’s need and achieves the following three attributes:
- Answers an argument or question: It provides a clear, definitive answer to a question or argument a user has.
- Prescriptive and tactically actionable: The content should have at least one tactical takeaway that can be executed by the intended audience, such as signing a petition, volunteering, or donating.
- Self-contained: The prescriptive action or answer must include all necessary information so that the reader can act or deliver that answer without additional research. If you have existing content that could clarify an answer, you should link to it. Ask yourself: Could the reader comfortably act on your advice without using Google?
How you decide what content to produce should depend on two things:
- Your website objectives and business goals
- What your users want from your website
Ideally, you should blend both options when making content.
For example, if you want to increase dog adoptions, you’ll create a page for each adoptable dog. On that page, write about the dog’s personality and answer common questions people ask in person. Also, provide multiple photos of the pooch, and let people know when and where they can meet her. Last, include links to resources about the adoption process and the lifestyle people should be prepared for if they adopt a dog.
Content production can be a long and tricky process, but it’s necessary if you want to provide a positive user experience. When you’re ready, the following guides will walk you through content ideation and creation:
Step 10: Monitor Your Content
The last step is also one that never ends. You should evaluate your content’s performance on a regular basis to know if it’s performing to your expectations. The first step is to choose content KPIs to evaluate. Next, determine how often you want to audit your content. Last, update any underperforming content, so it better abides by the high-quality guidelines in step nine. If the content can’t be updated, remove it from the website and set up a 301 redirect to a relevant page.
If you have existing content and want to check its performance, try Animalz Revive, a free tool that syncs with your Google Analytics data to highlight blog posts and other web pages that suffer from content decay (stale, stagnated, or out-of-date content) and should be updated.
If you want to dive deeper into content strategy, here are two more of our favorite resources:
- How to Choose a Content Hub: 6 Types and Examples
- The Ultimate Step-By-Step Guide to Content Strategy
Pay-Per-Click Advertising (PPC) for Nonprofits
PPC advertising is a crucial tool to drive user engagement, increase donations, and build brand recognition. PPC allows nonprofits to target potential donors, volunteers, or advocates while they browse search engine results, explore a website, or watch a video.
Best of all, nonprofit businesses are eligible for the Google Ads Grants program, which awards $10,000 per month to advertise on Google’s search network.
Step One: Sign Up for a Google Ads Account
Sign up for Google Ads, formerly known as Google Adwords. It’s free, and Google has the most robust paid advertising platform around.
If you’ve never used Google Ads or any PPC platform, I suggest enrolling in Google’s free paid advertising academy, which teaches newcomers everything they need to know about Google Ads.
Step Two: Sign Up for Google Ad Grants
As previously mentioned, nonprofit businesses are eligible for the Google Ad Grants program. You should sign up for it. Small-to-medium nonprofits may not even eclipse the $10,000 per month the grant provides, effectively letting you run a PPC campaign for free.
There are terms and conditions which you must agree to, and there are strict guidelines you must abide by if you use this program (e.g., quality score requirements, CTR requirements, click cost ceilings).
Step Three: Download Google Ads Desktop Editor
In 2021, nonprofit spending on digital ads increased by 19 percent compared to the previous year.¹ Most digital ad spend went to direct fundraising asks, accounting for 52 percent of all budgets.¹ Branding, awareness, or education advertising made up 32 percent of ad budgets, and lead generation consumed 15 percent.¹
Every dollar earned and spent online should be part of a larger plan.
Before allocating any money to a campaign, you need to ask yourself one question: what is the goal of this specific campaign?
For most nonprofits, the best goal is to efficiently acquire direct leads to a donation or volunteer page. Hopefully, this exposure introduces new potential members or donors to your organization.
If you choose this goal, the ads you run should show users why your organization is important, how it affects causes they care about, and encourages them to keep in touch to get more involved.
Step Five: Learn PPC Lingo
Much like Analytics and SEO, PPC has its own lingo, and knowing common phrases will make creating ads and going through Google Academy significantly easier. Below are the most important terms for you to know.
Metrics
CPC: cost per click (cost divided by clicks)
CTR: click-through rate (clicks divided by impressions)
CVR: conversion rate (leads or conversions divided by clicks)
CPA or CPL: cost per acquisition or cost per lead (cost divided by leads or conversions)
Impression Share: your visibility or “share of voice” (impressions divided by total search volume)
Other Key Terms
Campaign: a collection of ad groups that has a daily budget assigned to it. These are typically differentiated systematically by keyword category (for example)
Ad group: a collection of keywords and the corresponding text ads which are eligible to show to users when one of those keywords is triggered by a user’s search query
Quality Score: a measurement of a keyword’s quality (ranging from 1-10) that directly factors into how much you pay for a click
Ad Rank: a value assigned by Google in an auction that determines your ad’s position on a SERP (or if it shows up at all)
Bid Strategy: an automated bidding option offered by Google. There are several; advertisers can choose those that make the most sense based on their campaigns’ goals
Step Six: Brainstorm Keywords
After you’ve determined the campaign goal, your next step is to consider which phrases people will most likely search for that are relevant to your organization and can result in a lead.
I recommend you work your way from the bottom of the funnel to the top. Users who search for your organization’s name are typically the most likely to convert, so start with these branded phrases.
After accounting for branded search terms, take a look at your website and use your main category pages (navigation categories, core product or service pages, etc.) as starting points. Each of these categories can be its own PPC campaign. Plus, you can evaluate the organic keywords that are directly relevant to each category to get inspiration for your paid keyword strategy.
For example, let’s say you run a local food shelter and need more volunteers. Your website has a volunteer page, which contains all the information users need to sign up for volunteer work. You can create a PPC campaign focused on keywords potential volunteers might search for, such as “food shelter volunteer.” The ads would send users to the volunteer page on your website and hopefully get new sign-ups.
Step Seven: Verify PPC Keywords
Once you have a list of initial keyword ideas, use Google Ads’ keyword planner to determine if those terms are searched for in volume. Ideally, you want to target keywords that have high volume and low competition scores. Afterward, you can sort the chosen keywords into ad groups and campaigns, which you can then add to your Google Ads account and expand upon.
Before you move to step eight, read this keyword volume guide by WordStream. The resource delves into everything you need to know about keyword search volume, which is relevant for PPC and SEO.
Step Eight: Add More Keywords
After you’ve determined the base keyword list, including branded terms, you’ll want to move up the funnel and expand your keyword selection to target concepts tangentially relevant to your organization.
Consider what phrases apply to your user demographic but are not directly related to your nonprofit. If you want to target users who are interested in food scarcity but don’t currently volunteer, you might research the keyword volume for terms like “hunger statistics in Seattle,” and then build campaigns around the results.
Keep repeating this process until you’ve exhausted your keyword opportunities or surpassed your target budgets.
If you want a more in-depth look, read WordStream’s guide to researching and developing a PPC keyword strategy.
Step Nine: Choose Destinations for the Ads
If you have a great website with robust content and high conversion rates, it’s feasible to use topically relevant pages on your site as landing pages for your PPC campaigns. However, if your site is lacking content specific to a campaign topic, then you should consider developing a custom PPC landing page.
Unbounce has a good guide you should read if you are interested in developing custom PPC landing pages.
Step 10: Choose Your Ad Types
The ad format directly affects click-through rates, conversion rates, cost per lead, and cost per acquisition. Which format you choose and how much budget you dedicate to each method depends on four factors:
- Online advertising budget
- Campaign goals
- Keyword volume and competition
- Remarketing efforts
For display advertising, like banner and video ads, how much money a nonprofit spends to earn a donation depends largely on the organization’s size, reputation, and recognition.
Instead of the industry jargon term of cost per lead, let’s consider your goal to be the cost per donation, which refers to how much a nonprofit has to spend on online ads to generate a single donation. The following chart shows the average cost per donation by industry and ad type.

The significant difference boils down to budget, industry, and name recognition. Smaller nonprofits have less recognition and smaller budgets to raise awareness; consequently, users often perform more research before donating to the cause. Whereas large nonprofits already have an established trust factor, bigger budgets and require less scrutiny.
Budget-wise, large nonprofits spend four times more than small nonprofits on digital ads. Small nonprofits invested $0.02 per dollar of online revenue, while large nonprofits invested $0.08 per dollar.¹
For small nonprofits, text and search ads are best used to build brand awareness or remarket to users who have previously interacted with your website. Check out PPC Hero’s guide for more information about remarketing purposes and strategies.
If your campaign goal is to target high-intent users who are looking for a specific cause or nonprofit, you’ll want to use search ads because the conversion rate per donor will likely be better.
Small nonprofits also likely have small search pools with limited keywords and low to moderate keyword volume. I recommend that small nonprofits (and some medium-sized) max out their budget on the best search keywords and search campaigns. Despite the average cost of $46 per conversion, the conversion rate will likely be higher because the leads are more qualified and lower funnel.
If search alone proves to be too cost-prohibitive or if you’re competing in an extremely competitive space, a blend of display and search ads can be a viable solution.
After you’ve optimized your search opportunities, use remarketing to target users with display ads.
Step 11: Write the Ad Copy
Once you plan your campaigns, make sure you write ad copy that speaks directly to the terms present in each ad group. The copy should be concise, convincing, and have a clear call to action, so the users know what to expect if they click your ad.
If you use Google Grants, you must maintain a high CTR threshold, so ensure your ad copy is relevant and direct. Read this Google ad copy best practice guide by Unbounce and Portent’s blog post on ad directness to ensure your ad copy is in tip-top shape.
Step 12: Publish the Ads and Monitor Results
Publish the Google Ads campaigns that you want to run. Once your campaigns begin generating impressions, clicks, and (hopefully) leads, you want to analyze and optimize the campaigns.
Does one specific campaign have lots of clicks but no leads? Consider decreasing this campaign’s daily budget, changing its bid amounts or bidding strategy, altering keyword match types, or pause a keyword that’s wasting money, and so on. Eventually, you should see your conversion metrics improve and your profitability increase.
As you bound further down the optimization burrow, read the following blog posts for more PPC strategies and techniques:
- Why Your Average Cost Per Click is So High and How to Fix It
- Improve Your Quality Scores With These Simple Tips
- 6 A/B Tests for PPC You Have to Try
- Funnel-Based PPC Account Strategy: An Overview
Paid Social Media Advertising for Nonprofits
Paid social media advertising is a powerful way to introduce your brand to a pool of new but relevant users. You can use paid social to target users who fit your target demographic or interact with your company’s social media profile by using personalized and interactive creative content.
Although PPC and paid social use similar strategies, PPC is a “push channel,” while paid social is a “pull channel.” Unlike PPC, which targets people’s intent and pushes them toward taking action, social media users aren’t actively looking for a certain nonprofit or want to learn about a specific cause. But you can pull users toward your brand by serving them the right creative at the right time. Using this tactic, you can convert these users into new donors, volunteers, or advocates.
Step One: Choose What Social Media Platforms to Use
Facebook, Instagram, and Twitter are the best social platforms for nonprofits to use for paid advertising.
What type of content your users find engaging is the most important consideration when you choose a social media platform because each platform is tailored for specific content. We suggest you chat with your donors, volunteers, and staff about what content they want to interact with and then decide if you have the resources to produce that tailored content.
While you’re doing this research, here are a few pros and cons to keep in mind for each social platform.
Facebook/Instagram Pros
Both platforms have a huge audience, and frequent users — Instagram has more than 1 billion users, and 2.23 billion people log on to Facebook monthly. The content you publish is longer lasting than Twitter. Emotional or eye-catching photos and videos tend to perform best on Facebook and Instagram. The platforms are easy to use and familiar to most people. And Facebook provides lots of free resources for nonprofits to get started.
Facebook/Instagram Cons
Organic reach has fallen dramatically compared to what it used to be. For a nonprofit that doesn’t already have a presence on Facebook, it will be difficult to build an audience without putting ad dollars behind the account.
Twitter Pros
Easy to communicate with users. Twitter has lots of daily users, and it’s growing in popularity. Plus, with hashtags and trends, it’s easy to find trending topics and join relevant conversations.
Twitter Cons
Tweets age out after a few minutes because so much content is being published to a user’s timeline at once.
If you want more information about the types of social media ads and how each platform uses them, read Hootsuite’s social media advertising guide.
When deciding which platforms to use, keep brand persona consistency in mind. The brand should feel similar across each social channel, including the account name, imagery, and tone and voice. Although the content is unique on each platform, users should be able to follow your different accounts and still tell that the content comes from the same company.
Step Two: Determine Platform Goals
Before you dive into developing a social media strategy, you should determine what your main goal for each platform is, such as customer service, community building, lead generation, event promotion, etc. The strategy doesn’t need to be the same for every platform, nor does each platform need to get equal attention. However, your chosen goals should influence your decisions in the following steps. Buffer provides a great overview of common social media advertising goals and metrics that you could consider. Check out their guide if you want to dive into this subject further.
If you choose to use and advertise on Facebook or Instagram, you’ll need to get your profile verified and sign additional terms and conditions. Both platforms have different ad guidelines for companies that promote ads on topics of “national importance.” Because most non-profits are mission-based, following these guidelines is crucial. Without verification, your ads could be denied because your account isn’t approved to discuss certain topics.
Step Three: Get Verified
If you choose to use and advertise on Facebook or Instagram, you’ll need to get your profile verified and sign additional terms and conditions. Both platforms have different ad guidelines for companies that promote ads on topics of “national importance.” Because most nonprofits are mission-based, following these guidelines is crucial. Without verification, your ads could be denied because your account isn’t approved to discuss certain topics.
Step Four: Sign Up for Facebook Charitable Giving
Another resource to take advantage of during the early stages of your social strategy is Facebook’s Charitable Giving program, which lets users donate to your organization directly from Facebook profiles or feeds. The program also lets Facebook users set up fundraising campaigns on their personal profiles for your organization.
Step Five: Sign Up for Instagram Donations
After you’re approved to use the Facebook Charitable Giving program, you should set up Instagram’s donation button and stickers, which let users donate up to $2,500 through the platform.
Step Six: Set a Realistic Budget
Unfortunately, unlike PPC, nonprofits don’t get free advertising money each month from social media platforms. It’s important you establish a realistic campaign budget to make your money stretch its furthest and get the most value from every cent.
There are a lot of guides to read about establishing social advertising budgets. Buffer provides a great guide about how to run a social campaign with a $100 budget. Medium-sized nonprofits with more advertising money and content resources should read Hootsuite’s guide, which helps you plan out all the budget considerations you’ll encounter.
Step Seven: Establish Your Campaign KPIs
Think back to the platform goals you established in step two. Now, before you begin building each campaign, you should determine how you’ll measure if those goals are being met.
To figure out the nuts and bolts of KPIs, I recommend reading Unbounce’s excellent guide on establishing and measuring social media campaign KPIs.
Step Eight: Determine What Content to Promote
Step one advised thinking about the types of content you’d promote for each platform. Now, it’s time to create that content and put it to use.
I encourage you to mix different media types for your social media content. Most of your posts should incorporate blog posts, educational resources, as well as images and videos to tell personal stories about your community and your nonprofit’s impact.
If you have a consistent content production schedule as part of your content strategy, you can resurface that content on social media and alleviate the amount of content you’d otherwise need to produce. If you don’t have a steady stream of content being produced, you’ll need to develop content specifically for your social platforms. Refer back to the research you did in step one, alongside the KPIs you’ve established, to help decide what content you should produce.
Step Nine: Make Fast, Mobile-Friendly Landing Pages
Mobile users, particularly those engaging with social media content, expect landing pages to load almost instantly. If the page takes more than four seconds to load, 38 percent of users will abandon the journey and rarely return.
Mobile page speed is also more important for paid social campaigns because advertisers pay for impressions and link clicks. When users abandon the page before it loads, advertisers lose money without users ever seeing the landing page content.
It’s crucial that any landing page your social campaign uses is optimized for mobile, including site speed. Wordstream has a guide that will teach you how to design and optimize a mobile landing page. And although I’ll discuss site speed more in the SEO section, if you want to skip ahead and get started early, Portent’s ultimate guide to site speed will cover everything you need to know.
Step 10: Create the Campaign Plan
After you identify the content you want to build and promote, the next step is to plan your campaign. Before you write the ads, make sure you know the following information:
Campaign Title: Make sure you have a campaign title to discuss the campaign both internally and with users.
Identify a Campaign Team: Know who is going to manage posting, monitoring, and tweaking the campaign content.
Campaign Budget and Length: To stay within budget and hit your KPIs, you must have an idea of how long your campaign should go on. Here are a few tips on choosing campaign length in case you’re not sure where to start.
Content Schedule: Know what content you’re publishing, when you’re publishing it, and whom you’re targeting. Also, know which landing pages are paired with your scheduled content.
Step 11: Write the Ads
There are several schools of thought on how to write great social media ad copy. Below are a few resources to get you started:
- 9 Tips to Write the Best Facebook Ads Ever — WordStream
- 7-Step Social Media Advertising Strategy to Better Performing Ads — Sprout Social
- 10 Tips for Writing Social Media Ad Copy That Converts – Portent
Nonprofit organizations must also be aware of the language they use on social media. Social users are not afraid to provide positive or negative feedback to a nonprofit that stands for specific values. These comments or reviews can hold a lot of sway over users that are considering engaging with a small nonprofit. To maintain consistent language use across platforms and minimize the risk of user blowback, make sure to do three things with every ad:
- Follow your organization’s voice and tone guide
- Tailor ad copy to the best practices of each platform
- Be clear and concise with your CTAs
Optional Step 12: Choose Hashtags
If you choose to use hashtags in your social posts or paid social ads, the most important concept to keep top of mind is hashtag relevancy. It is better to use one hashtag that is extremely relevant than 20 that are not. If popular or trending hashtags are not relevant to your campaign, service, or industry, then don’t include them in your ads or posts.
Optional Step 13: Consider Using a Content Management System
Managing social media campaigns for multiple platforms can take considerable amounts of time and resources. If you plan to advertise or promote content on more than one platform, consider using a content management system, such as Hootsuite, Buffer, or SocialOomph. These programs help manage and maintain your social media channels in one location, and many companies offer free basic accounts. Business software site Capterra has a good guide on social media CMS if you’d like to learn more.
Search Engine Optimization (SEO) for Nonprofits
Optimizing your website and its content for search engines allows people to discover your organization when they search online for relevant queries. SEO for nonprofits is practically the same as SEO for any other organization, except that local-focused nonprofits should double down on their local SEO efforts.
Your ultimate SEO goal is to appear in the top three Google search results for search queries relevant to your cause or brand name. You want to aim for the first three Google results because they get 75.1 percent of all clicks, with the first result getting an average click-through rate of 31.7 percent, which is 10x more likely to receive a click than a page in the tenth position.
Without proper SEO, websites generally struggle to get discovered unless somebody searches with a site-specific or branded query. But a full-throttle SEO campaign is resource-intense and never-ending. Instead of tackling all 200 ranking factors, I suggest you focus on the following eight areas of improvement. These tasks are among the most important ranking factors and can significantly improve your website’s chances of ranking well:
- Secure your site with HTTPS
- Make your site mobile-friendly
- Improve page load speed
- Produce quality content
- Include the correct schema markup
- Promote your site on social platforms
- Establish a strong local SEO strategy
- Earn quality backlinks
You can learn the high-level concepts for most of these ranking factors with a beginner-friendly SEO guide from OptinMonster. In the steps below, I’ll walk you through what you need to do to establish a strong foothold in SEO and set yourself up for success by implementing these steps.
Step One: Sign Up for Google Search Console
Sign up for Google Search Console (GSC), a free tool from Google to monitor Google traffic and search engine rankings and discover any technical website errors. Search Console also lets you submit any new web pages, sitemaps, and robots.txt to Google’s web index. It’s an invaluable SEO tool.
There are a lot of features, tips, and tricks to Search Console. You can learn the ins and outs of the tool from Backlinko, which has one of the most comprehensive and user-friendly GSC guides available. Ahrefs also has a great GSC guide in case you want a second option.
Step Two: Learn Common SEO Terms and Concepts
SEO is full of niche terms and concepts. Moz has a great guide that covers the most important SEO terms you should know.
Step Three: Secure Your Website with HTTPS
HTTPS is a must for any website with forms, e-commerce, donations, or other privacy vulnerabilities. Plus, HTTPS is a vital SEO ranking factor.
If you don’t have knowledge of website encryption and server configuration, setting up HTTPS can be a bit intimidating. The multi-step process requires coordinating with different parties, and a lot of the steps simply sound confusing. Fortunately, SmashingMagazine has a robust guide to swapping your website from HTTP to HTTPS. Portent does as well, if you want more information on HTTPS migration.
Step Four: Optimize for Mobile
Mobile traffic continues to overtake desktop traffic for most websites, which means nonprofits must provide an excellent mobile experience.
In 2021, mobile users made more than half of all web traffic to nonprofit websites, with 54 percent of users visiting on a mobile device and 46 percent on a desktop computer.¹
However, despite mobile visitors providing more total site traffic, desktop users continue to out-donate mobile users. The average donation made on a desktop device was $75, while mobile users donated an average of $46.¹
The difference is often attributed to user intent (why someone visits your website) and an unsatisfactory mobile experience. Designing a seamless mobile experience for users is crucial for SEO and satisfied donors and volunteers.
In September 2020, Google implemented its “mobile-first indexing” rule. The rule means that Google’s web crawlers look at a website’s mobile experience before its desktop experience and then rate the website accordingly, with mobile being heavily weighted.
Below are a few different guides that cover everything you need to know. Some of the guides have varying strategies, but all of them are viable, so choose which ones best align with your resources:
- Mobile Optimization Learning Center — Moz
- Mobile SEO: The Definitive Guide — Backlinko
- The DIY Mobile SEO Guide: How to Be Mobile-First in 2020 — OptinMonster
When you’re done with the changes to your website, remember to double-check if your site is mobile-friendly with Google’s free tool.
Step Five: Increase Site Speed
Now that your website is mobile-friendly, the next task is to make sure everything loads fast, particularly images. As we discuss in the social media section, mobile users are impatient and bounce from websites that take more than three seconds to fully load.
Portent’s ultimate guide to site speed will cover everything you need to know, starting with the basics and transitioning into more advanced techniques.
Step Six: Sign Up for Moz Keyword Explorer
SEO tools are invaluable for an SEO campaign, but they’re generally expensive. We suggest you sign up for Moz Keyword Explorer because they offer a version of the tool that lets you search for keyword volume and difficulty for a few keywords every day, for free.
If your organization is diving deeper into its SEO efforts, we suggest you either purchase a subscription to MOZ or consider similar SEO tools like Ahrefs and Semrush. Both tools also have free versions, but you run into the paywall faster than with Moz Keyword Explorer.
Step Seven: Perform Keyword Research
Keyword research determines what words, phrases, and topics people search for online. You’ll use this information to determine what content to write and how you write it. Learning how to do keyword research for the first time can quickly get overwhelming. Fortunately, keyword research is a bit like riding a bike; once you’ve done it once, it’s easier the next time.
Backlinko has the best keyword research guide I’ve read. It’s up-to-date, beginner-friendly, and covers almost everything you need to know. Give yourself at least two hours to read the guide and perform your first round of research. If you don’t like the Backlinko guide, Moz also has an excellent option.
While you read the guide, keep in mind that you’ll also want to focus on local keywords to target people directly in your community. These folks will use location-focused keywords, such as “animal shelter near me” or “at-risk teen mentoring in Seattle.”
In addition to the techniques and strategies you’ll learn in the Backlinko or Moz guides, I recommend you perform local keyword research using a local-focused tool such as Bright Local or Grepword’s hyper local tool. Neither of these tools is completely free, but Bright Local does offer a free trial, and Grepword’s basic plan is $15 a month. Both tools provide insights about niche, local keywords, and their search volume, which many of the larger keyword tools don’t track.
Below are two additional free keyword research and SEO tools to help you:
- Answer The Public — Learn what people search for online and how they phrase questions.
- CanIRank — Dissolve the convoluted aspects of keyword difficulty and discover how difficult it is for your website to rank for a term.
Step Eight: Identify Where to Incorporate Keywords
After you’ve decided on the keywords you want to use, you need to either write copy using these terms or strategically insert the keywords into existing content. If you’re adding keywords to existing content, you should have identified those pages in the keyword research stage.
There are two crucial rules for inserting keywords:
- The keywords must appear natural. Don’t force a keyword into a sentence where it doesn’t naturally fit. It’s obvious to readers and search engines, and neither will appreciate it.
- Avoid keyword stuffing. Don’t shoehorn keywords repetitively in the copy. Doing so can negatively affect your site’s search rankings, or cause your content to be removed from search listings altogether. There is no rule of thumb for the number of times a keyword should be used. Again, the goal is to make sure the writing sounds natural.
Step Nine: Monitor Your Results
The reason digital marketing is successful is that you can monitor everything. Data is King. But to ascend to the throne, you need to collect that data and understand it.
You’ll combine what you learned about Google Search Console and Google Analytics to track if your SEO efforts are successful. The best SEO metrics to monitor are:
- Impressions
- Organic Sessions
- Organic Conversions
- Organic Click-Through Rate
- Pageviews
- Time on Page
- Bounce Rate
- Topic and Keyword Rankings
- Share of Voice
- Backlinks
- Page Load Speed
- Number of Pages Indexed
- Crawl Errors
- Moz Domain Authority
Read Portent’s blog post, How to Measure SEO Performance: Vital Metrics & KPIs to learn more about these metrics, how you measure them, and why.
Step 10: Build Backlinks
Backlinks (when somebody links to your website from theirs) from authoritative websites are a positive ranking factor and help people discover your content and brand. Generally, nonprofits have an easier time earning backlinks because people are more willing to link to nonprofit sites than for-profit business sites.
Link building is an enormous part of the SEO industry, and there are dozens of different tactics to try. I linked two of my favorite guides below, but you likely won’t need to put much effort into acquiring links beyond the following three steps:
- Ask local news organizations that cover your cause, events, or organization to provide a link back to your website. A link to the home page, about page, or cause-focused content are often the best options.
- When you publish a high-quality blog post or educational resource, ask other websites that discuss similar topics to link to your blog article.
- Produce quality content that follows the steps in the content strategy and SEO sections. If you invest your time and resources to make useful, quality content and it begins ranking for relevant keywords, you’ll naturally acquire backlinks.
Link building guides for more information:
Optional Step 11: Set Up Google My Business
If your nonprofit organization services the local community, you need to sign up for a Google My Business (GMB) account. GMB is a free tool from Google that improves local rankings and visibility on desktop and mobile.
The platform lets you manage how your business appears in Google’s Knowledge Panel sidebar. Through GMB, you can display your nonprofit’s name, physical location, and hours. It also lets you monitor and reply to user reviews.For setting up GMB using best practices, I recommend HubSpot’s beginner-friendly GMB guide. Afterward, look at Google’s advanced tips to optimize your local online presence further.
Optional Step 12: Give Your Developer Our SEO for Developers Guide
If your organization has access to a web developer, Portent has a comprehensive guide for developers to execute on the SEO needs you’ll bring them. If you don’t have a developer and are running into technical roadblocks when trying to implement my recommendations, you might find some solutions in the guide, too.
And That’s A Wrap
At the beginning of this guide, you may have been reluctant to dip your toes into the previously murky waters of digital marketing. You still might be, and that’s O.K. After all, digital marketing requires a lot of time—a resource nonprofits always need more of.
But if you decide to dive into the deep end, I hope the steps you read illuminate the depths of what you need to accomplish to build a digital presence from the ground up. And if you have the resources to implement the techniques and strategies I discuss, please dedicate that time and energy. The investment pays off, and you’ll be in a better position to fight for the causes you care about. If you don’t have the resources to set up your NGO’s digital strategy, contact us. Portent provides pro-bono work for one to two nonprofit organizations each year.
Quick and Dirty Resource List
Analytics
- Sign up for Google Analytics
- Set up your website as a property in Google Analytics
- Create your first Google Analytics reporting view
- Add the analytics tracking tag to your website
- Configure a Destination Goal in Google Analytics
- Get Google Tag Manager
- Track third-party conversion pages in Google Tag Manager
- Enroll in the free Google Analytics Academy
- Sign up for Hotjar
Content Strategy
- Define your website’s goals
- Create a customer journey map
- How to decide what goes in the navigation
- How to write descriptive navigation labels
- Make sure your navigation is mobile-friendly and responsive
- Learn donation form best practices
- Optimize the footer
- Hubspot’s Guide to Content Creation
- How to Fill an Editorial Calendar
- The Best Content Research Tools
- Choose content KPIs to evaluate
- Determine how often you want to audit content
- How to set up a 301 redirect
PPC
- Sign up for Google Ads
- Join Google Ads Grants
- Enroll in Google’s free paid advertising academy
- Download the desktop editor program
- Use Google Ads’ keyword planner
- Understand keyword volume
- Read the PPC keyword research guide
- Learn how to create PPC landing pages
- Learn remarketing techniques
- Discover PPC ad copy best practices
- Publish the Google Ads campaigns
- Why Your Average Cost Per Click is So High and How to Fix It
- Improve Your Quality Scores With These Simple Tips
- 6 A/B Tests for PPC You Have to Try
- Funnel-Based PPC Account Strategy: An Overview
Social Media Advertising
- Sign up for Facebook’s Social Good program
- Learn more about each social media platform and the types of ads you can use
- Build a brand persona
- Learn common social media advertising goals
- Install Instagram’s donation button and stickers
- Determine ad budget — small nonprofits
- Determine ad budget — medium-sized nonprofits
- Establish and measure social media campaign KPIs
- Choose the campaign length
- Design and optimize a mobile landing page
- Improve your site speed
- 9 Tips to Write the Best Facebook Ads Ever
- 6 Tips for Writing Social Media Ad Copy That Converts
- 7-Step Social Media Advertising Strategy to Better Performing Ads
- Choose a social media CMS
SEO
- Sign up for Google Search Console
- Learn how to use GSC from Backlinko and Ahrefs
- Learn SEO terms and concepts
- Swap your website from HTTP to HTTPS
- HTTPS migration guide
- Moz Mobile Optimization Learning Center
- Mobile SEO: The Definitive Guide — Backlinko
- The DIY Mobile SEO Guide: How to Be Mobile-First in 2020 – OptinMonster
- Run Google’s Mobile-Friendly Test
- Implement steps from the ultimate guide to site speed
- Sign up for Moz Keyword Explorer
- Backlinko keyword research guide
- Moz keyword research guide
- Bright Local’s keyword research tool
- Grepword’s hyper local tool
- Answer The Public keyword research tool
- CanIRank keyword research tool
- How to Measure SEO Performance: Vital Metrics & KPIs
- Off-Page SEO 101: The Essence of Ninja Marketing
- The Noob Friendly Guide To Link Building — Ahrefs
- Sign up for a Google My Business (GMB) account
- Understanding Google’s Knowledge Panel sidebar
- HubSpot’s beginner-friendly GMB guide
- Google’s advanced GMB tips
- A Developer’s Guide To SEO
Sources
Studies cited in this guide:


Thanks for the best post of the day.